[dropcap size=small]W[/dropcap]ho doesn’t like an extra cheese on a cheese pizza? Google DNS acts like the extra cheese to your existing internet connection’s speed. People using Internet dongles like Tata Photon, Reliance NetConnect or any other DialUp connection tend to receive slow speeds when compared to Broadband users. Citizens of world always seem belligerent towards their internet speed, especially when it is slow. [highlight ]Whenever you browse the web, your Internet Service Provider performs a DNS lookup to translate the URL to its Internet Protocol address before it render the pages. As complexity increases in web pages, an increase in the number of DNS lookup is observed and your Internet speed suffers.[/highlight]
So, how to increase the slow internet speed using Google DNS? Well, when you use Google Public DNS, you are changing your DNS “switchboard” operator from your ISP to Google Public DNS.
How can Google DNS increase my internet speed? See, Google DNS server is working with the Content Delivery Networks (CDNs). [highlight ]Whenever you browse internet, Google DNS server will send your location data along with DNS requests, so you will be connected to a server nearest to your location. Thus, speeding up your internet.[/highlight]
Google Public DNS IP addresses
The Google Public DNS IP addresses (IPv4) are as follows:
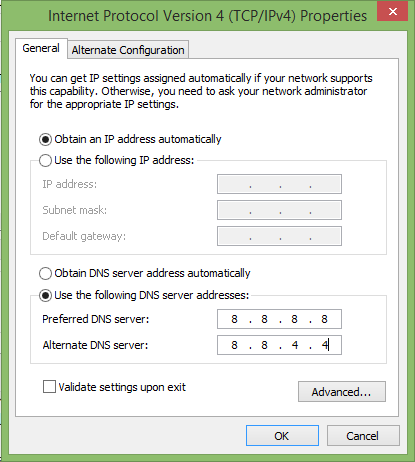
- 8.8.8.8
- 8.8.4.4
The Google Public DNS IPv6 addresses are as follows:
- 2001:4860:4860::8888
- 2001:4860:4860::8844
You can use either address as your primary or secondary DNS server. You can specify both addresses, but do not specify one address as both primary and secondary.
You can configure Google Public DNS addresses for either IPv4 or IPv6 connections, or both.
How to change your DNS?
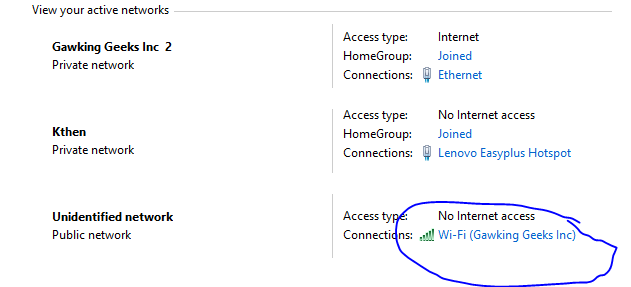
Open Control Panel and Go to Network and Sharing Center.
In network and sharing center, you will see this. Click on the network.
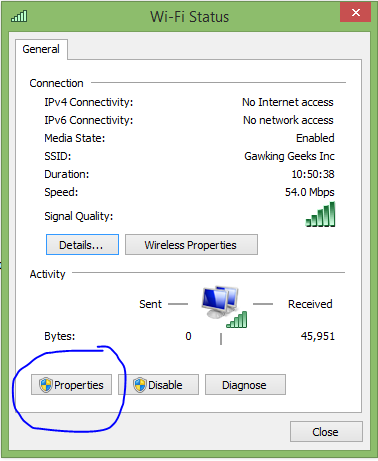
Select the network you are using. DNS will be changed for that network.
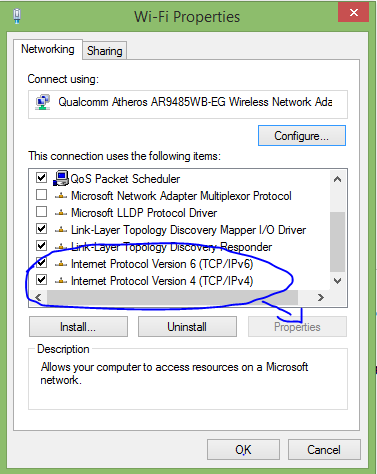
Select properties and this window will open.
Select Internet Protocol 4 or 6, whichever you want to customize first. Then, Click on Properties which will lead to this.
Select use the following DNS server addresses and change them with Google DNS server addresses.
[button color=”red” size=”big” alignment=”center” rel=”nofollow” openin=”samewindow” ]Boom! You are done.[/button]
[alert type=red ]In the above images, we showed how to change IPv4; repeat same steps for IPv6 if you want. The above screenshots are from Windows 8.1; if you need help with any other OS, please inform us in comments and Gawking Geeks will come to rescue.[/alert]


