This guide is for older versions of NVIDIA GeForce Experience prior to version 3.0 for a newer version guide, check this updated post on HOW TO ENABLE NVIDIA SHADOWPLAY ON UNSUPPORTED SYSTEMS.
[dropcap size=big]H[/dropcap]ave you ever missed the opportunity to show your friends some awesome stunt that you pulled in MotoX GP or some epic head-shot in Battlefield 4? Why not use some screen recording application to record your Gaming skills and cherish them later on or even broadcast it to the world? One of the most common and popular software for this task is FRAPS, followed by Bandicam and other professional and sophisticated screen recorders which get their job done. But, there’s a catch, most of these apps eat up a major portion of your frame rate and sometimes even reduce the quality of the recorded video (on top of that, they save files with idiotically large file size) making it a pain to use them on the low end to lower-mid end PC gaming systems. Solution: NVIDIA to the rescue.
The Good
After a long time of using in-game video capturing software like fraps, hypercam and bandicam which did their work fine apart from slashing down a substantial amount of frame rate one gets while recording, NVIDIA, revolutionized the way it’s meant to be recorded. They included ShadowPlay in the GeForce Experience bundle which was available after updating the drivers and GFE suite. They used the built-in H.264 encoder on the GPU die to take care of the recording stuff and prevented the gaming sectors of the GPU to get burdened by the recording overheads. In short and in simplest terms, they used the part of the GPU which was vestigial while gaming and assigned the job of recording to that part. Kudos!
The Bad
NVIDIA did a remarkably great job by making ShadowPlay available to every GeForce user and that too for free, but, here comes the sad part. There were certain requirements to use ShadowPlay on your rig. First one is very reasonable that your GPU must have a built-in H.264 encoder which is present in Kepler based cards and later. Apart from this sensible reason, NVIDIA then disabled the support for ShadowPlay on Notebook GPUs (Which pissed me off) but after certain updates, it was exclusively available for GTX series NVIDIA mobile GPUs and those GPUs which fell in the GT series were forbidden to utilize this epic piece of software.
Here Comes the Ugly
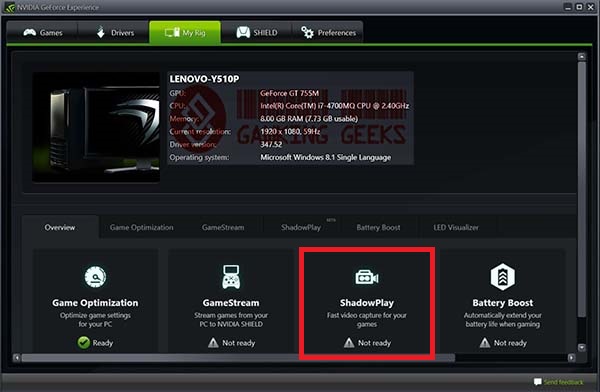
For some reason (which I really don’t have any idea about) my GeForce GT755M GPU on my Lenovo IdeaPad Y510p notebook didn’t have ShadowPlay support, which when asked why this was done in forums revealed that only “GTX” series Kepler mobile GPUs had this feature. This disappointed me since my GT755M had a better performing GK107 core which powers the same GTX 660M and the latter had ShadowPlay support. After googling about how to explicitly use ShadowPlay on your portable system. I found out a pretty easy trick and therefore decided to share it with you guys.
Note: This method is tried by myself and is working but has certain requirements like:
- Your mobile GPU should be based on a Kepler graphics core (And obviously it should be from NVIDIA lol).
- GeForce Experience version should be 1.8 or higher.
- NVIDIA ForceWare drivers must be at least 335.23 WHQL. (Though a bit older drivers are supported yet this version is the least I’d recommend)
Step One
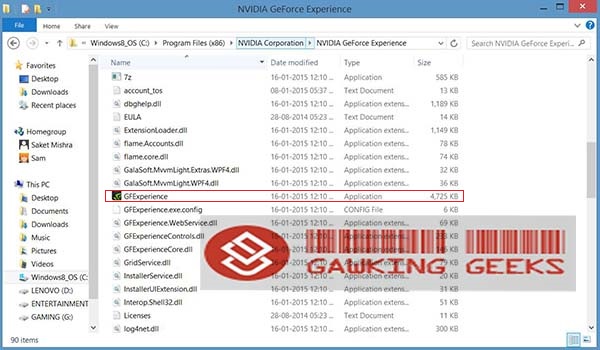
Open the location where GeForce Experience is installed on your PC. I had it installed from the very start hence the default path is shown in the pic.
Right-click on the GFExperience application launcher and create a shortcut on your desktop.
Step Two
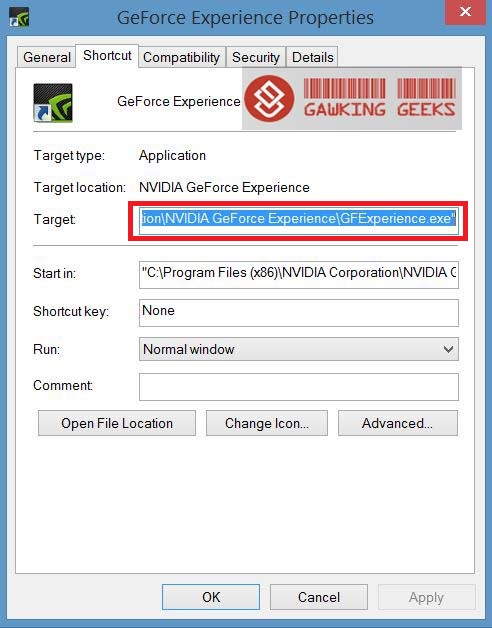
Right click on the newly created desktop shortcut of GFExperience and then select properties.
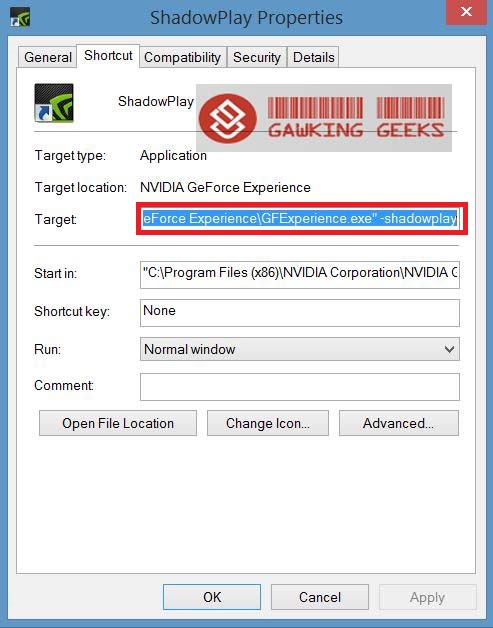
In the Target box, the link to the application to be opened when you click on the shortcut is written. Now, here comes the most important part. And make sure you follow every instruction.
Step Three
Add this to the target “ –shadowplay” Now, make sure you give a space and then punch a hyphen and then type shadowplay. (Exclude the quotes). Here’s a pic to elaborate this step.
You can also rename the shortcut like I did, just for convenience.
Step Four
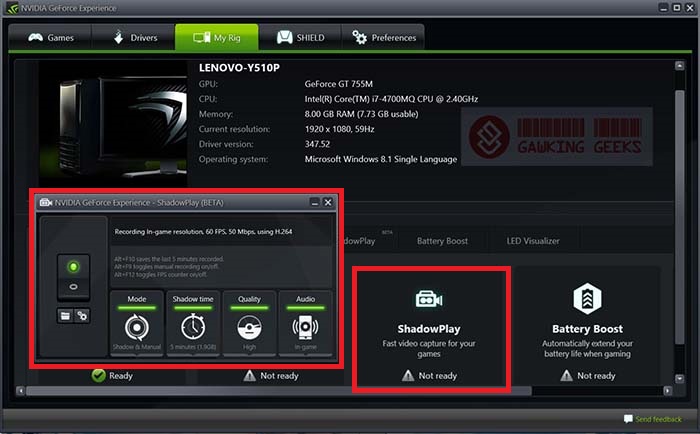
Now click on Apply then OK and then double click on the same shortcut and Voila! Shadowplay starts.
Conclusion
You can see the ShadowPlay on/off button, the mode switch, Shadowtime (Only in Shadow mode/Shadow+manual), the quality to keep in check the video size and then the audio options. Additional settings can be accessed from settings button (tiny little gear button below on/off switch) Set the preferences according to your taste, launch a game and get going what are you waiting for? 😉
PS: If it doesn’t work, some known issues like the shadowplay indicator is displayed in-game but the recording doesn’t start. Then simply uninstall Shadowplay and re-install it. That’d fix it. Having more queries? Leave a comment 🙂

